Video transcript
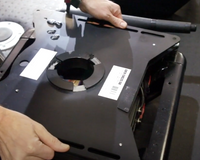
Hey, guys, We're looking at the RIB Passenger Swivel fitting today, which is this one. I've got them both out here, just to quickly show you the difference. So, basically, when you order one, it's gonna come with a full set of fitting instructions, which is gonna help. The passenger one is this one, and the driver's one is this one. They're very similar, obviously they turn in opposite directions and the driver one has got these extra raising shims, which raise it up above the hand brake as you spin it.
So, in the middle of the turning mechanism, you get your little pot of fixings, which has got six countersunk bolts and four nyloc nuts. Quite a quick job to do, you don't need many tools, five ml Allen key and a 13 ml socket or spanner. So, let's grab this one and we'll go and put it in the van.
So, what we've got in the van is a standard VW single passenger seat and driver's seat. So, what we gotta do is just slide this seat forward, so the first job is to unscrew that bolt and that bolt. So, down here, you've got a nut there on that sliding rail and over here, you've also got one which you can see just there, so, you take those out as well. If you need more access and your seat has got height adjustables, you can pump your seat up a bit, like that, to get a spanner in there or a little socket set.
Now, when you get your swivel plate in the van, you're looking to get the little red lever, the release lever, in the centre of the van, so it's gonna be on the handbrake side, basically. Obviously, the stickers go on top, and you should find that it just drops right on top of the two studs, two threaded studs on the front, and it just drops on like that.
Now, in order to secure the lower base, what we need to do is push the red handle forward and turn the base clockwise. If it's really stiff, sometimes the grease on the middle has jammed up, you might wanna give it a tap with a mallet.
Now, to secure the lower base, you're gonna need to reuse the two original black nuts that you took off the front seat and put both of those on. And then, on the back, you'll notice you've got two countersunk holes here, so we're gonna use two of these supplied countersunk bolts with an Allen screw head on them. Okay, so those go in there. And if you've got a decent set of Allen keys, you should be able to crank them up tight enough.
Okay, so you'll need a 13 ml spanner or a 13 ml socket. Pinch those up nice and tight as well. Okay, so that's the bottom in place, and then you wanna just get it to about there probably, and we're gonna put our seat back on there, 'cause we need to get access underneath to fix the C rails on.
So, we grab our seat and just gently place it back on top, approximately in the right position, like that. I'm in the front foot well of the passenger seat now, so we grab one of our countersunk bolts and it comes up from the bottom, and then we grab a nyloc nut and that just gets screwed on top of there, like that.
So in order to complete it, you'll need to put an Allen key underneath, spanner on top, or a socket and get that tightened right up, and we'd do that on that one and also, if you can see, on that other front one there. I'm looking at the back again, now you can see I've slid the seat right the way forward to give me some access, I've swivelled the top plate around so I can access this one and this one, and it's the same process, one countersunk bolt up through each hole, and a nut on top.
Okay, so that's our swivel seat installed. You can just about see it under there, that's the two plates of the swivel, and then the original seat runners up there. And that's what it looks like from underneath. So, once you've got your swivel in place, you've still got your full up and down on your seat height adjusters.
Now, obviously, 'cause you've put a swivel in here, your seat is gonna be naturally that bit higher, so your passenger will probably wanna put the seat down, so I'll show you what happens, as the seat goes down, if you look on the side where the little red lever is, as the seat comes down, the actual plastic on the seat base starts to hit that lever, so if I keep pumping down, that's as low as that seat will go, so it basically just nestles up against that lever, pushes it down slightly, so you can do nothing at all, you can leave it like that and it's absolutely fine, it just deforms slightly, or you can just keep your seat raised up.
Once you get to three or four pumps up, it comes off that lever. But, obviously, to rotate the seat, you'll need to slide your seat forward, and then push the lever forward and rotate the seat, and it comes round really easily, it's a very smooth mechanism. Once you get back round here, you can push the seat back towards the dashboard to really maximise the space you have in the back of your van. And it'll only rotate as far as there, basically. And then you can just shut your door.
And once you get to this point, you can then lower your seat back down again to a comfortable height, like that. And then, to swing it back again, you do the opposite, pump it back up again a handful of times, seat forwards, rotate, and you'll notice you can do it with the door shut as well, which is a really nice feature, 'til it locks in place, that red lever will engage, and then you can just move your seat back to a comfortable position for your passenger.
Okay, so that's it for fitting the RIB Passenger Swivel. Again, really straightforward, you don't need very many tools at all. Hopefully this will have helped, so, between this and the paper instructions, you shouldn't have any trouble, but if you do, give us a shout, email or drop us a line via the website or give us a call. Okay, thanks a lot.